Introduction
Importance of Learning Java in the Modern Tech Industry
Java remains one of the most widely used programming languages today due to its platform independence, stability, and versatility. It is used across industries for building reliable and scalable applications, making it an essential skill for anyone pursuing a career in software development. Learning Java also provides a strong foundation in object-oriented programming (OOP), which is fundamental for understanding other modern programming languages.
Popular Applications of Java
Java’s flexibility allows it to power a wide range of applications, including:
- Web Applications – Java frameworks like Spring and JavaServer Faces enable developers to build dynamic, robust websites and online services.
- Mobile Applications – Java is a primary language for developing Android apps, from simple utilities to complex mobile platforms.
- Games – Java is used for game development, particularly in desktop and mobile games, thanks to libraries like LibGDX.
- Enterprise Software – Many large corporations rely on Java for backend systems, enterprise resource planning (ERP), and financial software.
Purpose of This Guide
This guide is designed to provide a beginner-friendly, step-by-step approach to learning Java. It will take you from the basics of syntax and programming concepts to writing simple programs, ensuring a smooth learning experience for those new to coding. By the end of the guide, you should be able to confidently build and run Java applications while understanding the fundamentals of software de
Setting Up the Java Environment
Installing Java Development Kit (JDK)
Before you can write and run Java programs, you need to install the Java Development Kit (JDK). Follow these steps based on your operating system:
Windows
- Go to the Oracle JDK download page or use OpenJDK.
- Download the installer for Windows.
- Run the installer and follow the prompts.
- Set the JAVA_HOME environment variable:
- Right-click This PC > Properties > Advanced system settings > Environment Variables
- Add a new variable
JAVA_HOMEpointing to the JDK installation folder. - Update the
Pathvariable by adding%JAVA_HOME%\bin.
macOS
- Download the JDK for macOS from Oracle or OpenJDK.
- Open the
.dmgfile and follow installation instructions. - Set the JAVA_HOME variable by adding the following line to
~/.zshrcor~/.bash_profile:export JAVA_HOME=$(/usr/libexec/java_home) export PATH=$JAVA_HOME/bin:$PATH - Apply changes with
source ~/.zshrcor restart the terminal.
Linux
- Install OpenJDK using your package manager:
- Ubuntu/Debian:
sudo apt install openjdk-17-jdk - Fedora:
sudo dnf install java-17-openjdk-devel
- Ubuntu/Debian:
- Verify installation using
java -versionin the terminal. - Optionally, set
JAVA_HOMEin~/.bashrcor~/.zshrc:export JAVA_HOME=/usr/lib/jvm/java-17-openjdk export PATH=$JAVA_HOME/bin:$PATH
Choosing an IDE
Using an Integrated Development Environment (IDE) makes Java programming easier by providing code completion, debugging tools, and project management. Popular choices include:
IntelliJ IDEA
- Pros: Smart code completion, powerful refactoring tools, excellent for professional development.
- Cons: Heavy on system resources; the Ultimate version is paid.
Eclipse
- Pros: Free and open-source, highly customizable, strong plugin ecosystem.
- Cons: Interface can feel cluttered; slower startup time.
NetBeans
- Pros: Free and easy to use, good for beginners, integrated support for JavaFX.
- Cons: Less popular in industry; updates can be slower.
Verifying Installation
After installing the JDK, it’s important to verify that Java is properly installed:
- Open a terminal or command prompt.
- Type the following commands:
java -version javac -version - You should see the installed Java version displayed. If not, check your environment variables and PATH settings.
Writing and Running Your First “Hello, World!” Program
Once the environment is set up, you can write your first Java program:
- Open your IDE or a simple text editor.
- Create a new file called
HelloWorld.javaand add the following code:public class HelloWorld { public static void main(String[] args) { System.out.println("Hello, World!"); } } - Save the file and compile it using the terminal:
javac HelloWorld.java - Run the program:
java HelloWorld - You should see the output:
Hello, World!
Congratulations! You’ve successfully set up your Java environment and run your first program.
Java Basics
1. Variables and Data Types
In Java, variables are containers for storing data values. Every variable must have a data type, which defines the kind of value it can hold.
| Data Type | Description | Example |
|---|---|---|
int | Stores integer (whole number) values | int age = 25; |
double | Stores decimal (floating-point) numbers | double price = 19.99; |
char | Stores a single character | char grade = 'A'; |
String | Stores a sequence of characters (text) | String name = "Alice"; |
boolean | Stores true or false values | boolean isJavaFun = true; |
Example:
int age = 25;
double salary = 50000.75;
char grade = 'A';
String name = "Alice";
boolean isJavaFun = true;

System.out.println("Name: " + name);
System.out.println("Age: " + age);
System.out.println("Java is fun: " + isJavaFun);
2. Operators
Operators are special symbols used to perform operations on variables and values.
Arithmetic Operators
Used for mathematical calculations:
int a = 10, b = 3;
System.out.println(a + b); // 13
System.out.println(a - b); // 7
System.out.println(a * b); // 30
System.out.println(a / b); // 3
System.out.println(a % b); // 1
Comparison Operators
Used to compare two values, returning true or false:
int x = 5, y = 8;
System.out.println(x == y); // false
System.out.println(x != y); // true
System.out.println(x > y);  // false
System.out.println(x < y);  // true
Logical Operators
Used to combine boolean expressions:
boolean p = true, q = false;
System.out.println(p && q); // false
System.out.println(p || q); // true
System.out.println(!p);     // false
Assignment Operators
Used to assign or update variable values:
int num = 10;
num += 5; // same as num = num + 5
num *= 2; // same as num = num * 2
System.out.println(num); // 30
3. Comments
Comments are ignored by the compiler and used to describe your code.
- Single-line comment:
// This is a single-line comment
- Multi-line comment:
/* This is a
   multi-line comment */
Comments make your code easier to read and maintain, especially in larger projects.
4. Input and Output
Java provides several ways to handle input and output. The two most common are using System.out.println for output and the Scanner class for input.
Output Example:
System.out.println("Hello, Java!");
Input Example using Scanner:
import java.util.Scanner;

public class InputExample {
    public static void main(String[] args) {
        Scanner scanner = new Scanner(System.in); // Create Scanner object

        System.out.print("Enter your name: ");
        String name = scanner.nextLine(); // Read string input

        System.out.print("Enter your age: ");
        int age = scanner.nextInt(); // Read integer input

        System.out.println("Hello, " + name + "! You are " + age + " years old.");

        scanner.close(); // Close scanner
    }
}
Output:
Enter your name: Alice
Enter your age: 25
Hello, Alice! You are 25 years old.
Control Flow in Java
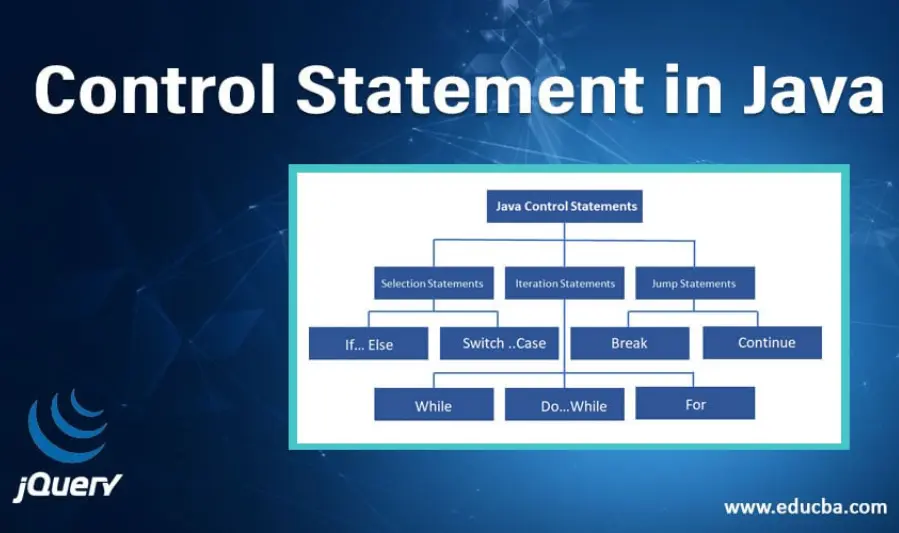
Control flow statements in Java allow your program to make decisions and repeat actions based on conditions. The two main types are conditional statements and loops.
1. Conditional Statements
Conditional statements help your program make decisions by executing specific blocks of code when certain conditions are met.
if, else if, and else
The if statement checks whether a condition is true. You can add else if and else to handle multiple possibilities.
Example – Checking if a number is positive, negative, or zero:
int number = 5;

if (number > 0) {
    System.out.println("The number is positive.");
} else if (number < 0) {
    System.out.println("The number is negative.");
} else {
    System.out.println("The number is zero.");
}
Example – Checking if a number is even or odd:
int num = 10;

if (num % 2 == 0) {
    System.out.println(num + " is even.");
} else {
    System.out.println(num + " is odd.");
}
switch-case Statement
The switch statement is used when you need to compare a single value against multiple possible cases.
Example – Simple menu using switch:
int day = 3;
switch (day) {
    case 1:
        System.out.println("Monday");
        break;
    case 2:
        System.out.println("Tuesday");
        break;
    case 3:
        System.out.println("Wednesday");
        break;
    default:
        System.out.println("Invalid day");
}
The break statement prevents the program from executing the next cases automatically. The default case runs if no other case matches.
2. Loops
Loops are used to execute a block of code repeatedly as long as a condition is true.
for Loop
The for loop is ideal when you know in advance how many times you want to run a block of code.
Example – Printing numbers 1 to 5:
for (int i = 1; i <= 5; i++) {
    System.out.println("Number: " + i);
}
while Loop
The while loop executes a block of code as long as the condition remains true.
Example – Counting down:
int count = 5;

while (count > 0) {
    System.out.println("Countdown: " + count);
    count--;
}
do-while Loop
The do-while loop is similar to the while loop, but it executes the code at least once, even if the condition is false.
Example – Executing at least once:
int i = 1;

do {
    System.out.println("Value: " + i);
    i++;
} while (i <= 3);
3. Using break and continue Statements
break: Exits the loop immediately.continue: Skips the current iteration and moves to the next one.
Example – Using break:
for (int i = 1; i <= 5; i++) {
    if (i == 3) {
        break; // exits the loop when i == 3
    }
    System.out.println(i);
}
Example – Using continue:
for (int i = 1; i <= 5; i++) {
    if (i == 3) {
        continue; // skips printing when i == 3
    }
    System.out.println(i);
}
Output of the continue example:
1
2
4
5
With conditional statements and loops, you can control how your Java program makes decisions and repeats actions — the foundation for writing dynamic and logical code.
Methods (Functions)
In Java, methods (also known as functions in other languages) are blocks of code designed to perform specific tasks. Methods help make your program modular, reusable, and easier to read.
1. Creating and Calling Methods
A method is defined using the following structure:
returnType methodName(parameters) {
    // method body
}
returnType– the type of value the method returns (usevoidif it doesn’t return anything).methodName– the name you choose for the method.parameters– values passed into the method (optional).
Example – Creating and calling a method:
public class GreetingExample {
    // Method definition
    static void greet() {
        System.out.println("Hello! Welcome to Java programming.");
    }

    public static void main(String[] args) {
        greet(); // Method call
    }
}
Output:
Hello! Welcome to Java programming.
2. Passing Parameters and Returning Values
Methods can accept parameters (inputs) and return values (outputs).
Example – Method with parameters and a return value:
public class MathExample {
    // Method that adds two numbers
    static int add(int a, int b) {
        return a + b;
    }

    public static void main(String[] args) {
        int result = add(5, 7); // Passing arguments
        System.out.println("The sum is: " + result);
    }
}
Output:
The sum is: 12
You can pass any data type as parameters — int, double, String, etc.
3. Method Overloading
Method overloading allows you to define multiple methods with the same name but different parameters (different number or type of arguments).
Java uses overloading to perform similar actions in different ways.
Example – Method overloading:
public class OverloadExample {

    // Method with two int parameters
    static int add(int a, int b) {
        return a + b;
    }

    // Overloaded method with three int parameters
    static int add(int a, int b, int c) {
        return a + b + c;
    }

    // Overloaded method with double parameters
    static double add(double a, double b) {
        return a + b;
    }

    public static void main(String[] args) {
        System.out.println(add(5, 10));        // Calls first method
        System.out.println(add(5, 10, 15));    // Calls second method
        System.out.println(add(2.5, 3.7));     // Calls third method
    }
}
Output:
15
30
6.2
4. Variable Scope: Local and Global
Variable scope determines where a variable can be accessed in your program.
Local Variables
Defined inside a method and can only be used within that method.
public class ScopeExample {
    static void display() {
        int number = 10; // Local variable
        System.out.println("Number: " + number);
    }

    public static void main(String[] args) {
        display();
        // System.out.println(number); // ❌ Error: number not accessible here
    }
}
Global (Class-Level) Variables
Declared outside any method (usually inside the class) and can be accessed by all methods in that class.
public class GlobalExample {
    static int count = 0; // Global (class-level) variable

    static void increment() {
        count++;
    }

    public static void main(String[] args) {
        increment();
        increment();
        System.out.println("Count: " + count); // Accessible here
    }
}
Output:
Count: 2
Using methods effectively helps you organize code, avoid repetition, and build larger programs in a structured way.
Object-Oriented Programming (OOP) Concepts
Java is an object-oriented programming language, which means it focuses on objects — entities that combine data (attributes) and behavior (methods). The four main pillars of OOP are Encapsulation, Inheritance, Polymorphism, and Abstraction.
1. Classes and Objects
A class is a blueprint or template that defines the properties (fields) and behaviors (methods) of an object.
An object is an instance of a class.
Example – Creating and using a class and object:
// Define a class
public class Car {
    String brand;
    int year;

    void startEngine() {
        System.out.println(brand + " engine started!");
    }
}

// Main class
public class Main {
    public static void main(String[] args) {
        Car myCar = new Car();   // Create object
        myCar.brand = "Toyota";
        myCar.year = 2022;
        myCar.startEngine();     // Call method
    }
}
Output:
Toyota engine started!
2. Constructors
A constructor is a special method used to initialize objects. It has the same name as the class and no return type.
Default Constructor
If you don’t define one, Java automatically provides a default constructor.
Parameterized Constructor
You can create your own constructor to set initial values for an object.
Example – Using constructors:
public class Student {
    String name;
    int age;

    // Default constructor
    Student() {
        name = "Unknown";
        age = 0;
    }

    // Parameterized constructor
    Student(String n, int a) {
        name = n;
        age = a;
    }

    void displayInfo() {
        System.out.println(name + " is " + age + " years old.");
    }

    public static void main(String[] args) {
        Student s1 = new Student();          // Calls default constructor
        Student s2 = new Student("Alice", 20); // Calls parameterized constructor
        s1.displayInfo();
        s2.displayInfo();
    }
}
Output:
Unknown is 0 years old.
Alice is 20 years old.
3. Encapsulation
Encapsulation means protecting data by making fields private and accessing them through getter and setter methods.
This prevents direct modification of sensitive data and ensures control over how it’s accessed or changed.
Example – Encapsulation:
public class BankAccount {
    private double balance; // private field

    // Setter
    public void deposit(double amount) {
        if (amount > 0) {
            balance += amount;
        }
    }

    // Getter
    public double getBalance() {
        return balance;
    }

    public static void main(String[] args) {
        BankAccount account = new BankAccount();
        account.deposit(1000);
        System.out.println("Current balance: $" + account.getBalance());
    }
}
Output:
Current balance: $1000.0
4. Inheritance
Inheritance allows a class to inherit properties and methods from another class.
The class being inherited from is called the superclass, and the class that inherits is the subclass.
Example – Inheritance:
// Superclass
class Animal {
    void eat() {
        System.out.println("This animal eats food.");
    }
}

// Subclass
class Dog extends Animal {
    void bark() {
        System.out.println("The dog barks.");
    }

    public static void main(String[] args) {
        Dog dog = new Dog();
        dog.eat();  // Inherited method
        dog.bark(); // Subclass method
    }
}
Output:
This animal eats food.
The dog barks.
5. Polymorphism
Polymorphism means “many forms.”
It allows methods to behave differently based on the object that calls them.
There are two main types:
- Compile-time polymorphism (method overloading)
- Runtime polymorphism (method overriding)
Method Overloading (Compile-time)
Using the same method name but different parameters.
class Calculator {
    int add(int a, int b) { return a + b; }
    double add(double a, double b) { return a + b; }

    public static void main(String[] args) {
        Calculator calc = new Calculator();
        System.out.println(calc.add(5, 10));
        System.out.println(calc.add(2.5, 3.5));
    }
}
Output:
15
6.0
Method Overriding (Runtime)
A subclass provides its own version of a method defined in the superclass.
class Animal {
    void sound() {
        System.out.println("Some sound");
    }
}

class Cat extends Animal {
    @Override
    void sound() {
        System.out.println("Meow");
    }

    public static void main(String[] args) {
        Animal myCat = new Cat();
        myCat.sound(); // Calls the overridden method
    }
}
Output:
Meow
6. Abstraction
Abstraction means hiding complex details and showing only essential features.
It can be achieved using abstract classes and interfaces.
Abstract Class
An abstract class can have both abstract methods (without implementation) and concrete methods (with implementation).
abstract class Shape {
    abstract void draw(); // abstract method

    void display() {
        System.out.println("Drawing a shape...");
    }
}

class Circle extends Shape {
    void draw() {
        System.out.println("Drawing a circle.");
    }

    public static void main(String[] args) {
        Circle c = new Circle();
        c.display();
        c.draw();
    }
}
Output:
Drawing a shape...
Drawing a circle.
Interface
An interface defines a contract — classes that implement it must define all its methods.
interface Vehicle {
    void start();
    void stop();
}

class Car implements Vehicle {
    public void start() {
        System.out.println("Car started.");
    }

    public void stop() {
        System.out.println("Car stopped.");
    }

    public static void main(String[] args) {
        Car car = new Car();
        car.start();
        car.stop();
    }
}
Output:
Car started.
Car stopped.
By understanding these OOP concepts — classes, objects, constructors, encapsulation, inheritance, polymorphism, and abstraction — you can design cleaner, more efficient, and scalable Java programs.
Arrays and Collections
In Java, arrays and collections are used to store and manage groups of data efficiently.
While arrays hold a fixed number of elements, collections (like ArrayList, HashMap, and HashSet) are dynamic and more flexible.
1. Arrays
An array is a container that stores multiple values of the same data type.
Each element in an array is accessed using an index, starting from 0.
Declaring and Initializing an Array
int[] numbers = {10, 20, 30, 40, 50};

// Access elements
System.out.println("First number: " + numbers[0]);

// Change an element
numbers[2] = 35;

// Loop through the array
for (int i = 0; i < numbers.length; i++) {
    System.out.println("Element " + i + ": " + numbers[i]);
}
Output:
First number: 10
Element 0: 10
Element 1: 20
Element 2: 35
Element 3: 40
Element 4: 50
Using Enhanced for Loop
String[] fruits = {"Apple", "Banana", "Cherry"};
for (String fruit : fruits) {
    System.out.println(fruit);
}
Output:
Apple
Banana
Cherry
Note: Arrays have a fixed size, meaning once created, their length cannot change.
2. ArrayList
An ArrayList is part of Java’s Collection Framework.
It functions like a resizable array, meaning you can add, remove, or access elements dynamically.
Creating and Using an ArrayList
import java.util.ArrayList;

public class ArrayListExample {
    public static void main(String[] args) {
        ArrayList<String> names = new ArrayList<>();

        // Add elements
        names.add("Alice");
        names.add("Bob");
        names.add("Charlie");

        // Access elements
        System.out.println("First name: " + names.get(0));

        // Remove an element
        names.remove("Bob");

        // Loop through ArrayList
        for (String name : names) {
            System.out.println(name);
        }
    }
}
Output:
First name: Alice
Alice
Charlie
Useful ArrayList Methods
| Method | Description | Example |
|---|---|---|
add() | Adds an element | list.add("Item"); |
get() | Gets an element by index | list.get(0); |
remove() | Removes an element | list.remove("Item"); |
size() | Returns number of elements | list.size(); |
clear() | Removes all elements | list.clear(); |
3. HashMap
A HashMap stores key-value pairs, where each key maps to a specific value.
Keys must be unique, but values can be duplicated.
Example – Using HashMap
import java.util.HashMap;

public class HashMapExample {
    public static void main(String[] args) {
        HashMap<String, Integer> ages = new HashMap<>();

        // Add key-value pairs
        ages.put("Alice", 25);
        ages.put("Bob", 30);
        ages.put("Charlie", 28);

        // Access value using key
        System.out.println("Alice's age: " + ages.get("Alice"));

        // Remove an entry
        ages.remove("Bob");

        // Loop through HashMap
        for (String key : ages.keySet()) {
            System.out.println(key + " is " + ages.get(key) + " years old.");
        }
    }
}
Output:
Alice's age: 25
Alice is 25 years old.
Charlie is 28 years old.
Common HashMap Methods
| Method | Description | Example |
|---|---|---|
put(key, value) | Add or update a pair | map.put("A", 1); |
get(key) | Retrieve a value | map.get("A"); |
remove(key) | Remove a pair | map.remove("A"); |
keySet() | Returns all keys | map.keySet(); |
values() | Returns all values | map.values(); |
4. HashSet
A HashSet stores unique elements (no duplicates) and does not maintain order.
It’s useful when you only care about the existence of items, not their position.
Example – Using HashSet
import java.util.HashSet;

public class HashSetExample {
    public static void main(String[] args) {
        HashSet<String> countries = new HashSet<>();

        // Add elements
        countries.add("Japan");
        countries.add("Canada");
        countries.add("Japan"); // Duplicate, ignored

        // Display all elements
        for (String country : countries) {
            System.out.println(country);
        }

        // Check if element exists
        System.out.println("Contains Canada? " + countries.contains("Canada"));
    }
}
Output (order may vary):
Japan
Canada
Contains Canada? true
Key Features of HashSet
- Stores unique elements (no duplicates).
- No guaranteed order of elements.
- Very fast for search, insert, and delete operations.
you may also like to read these posts:
Phát triển kỹ năng nghề thủ công
Discover the Beauty of Indonesian Traditional Fashion Styles
Mundo ng Bukas: Ang Papel ng Inobasyon sa Pag-unlad
Java for Beginners: Learn Programming the Easy Way
Summary
| Structure | Type | Key Features | Example Use |
|---|---|---|---|
| Array | Fixed-size | Stores multiple values of the same type | Storing marks of students |
| ArrayList | Dynamic | Can add or remove elements anytime | List of names or products |
| HashMap | Key-Value | Maps unique keys to values | Storing user data or settings |
| HashSet | Unique elements | No duplicates, unordered | Storing unique IDs or tags |
Exception Handling
1. Importance of Handling Errors in Programs
In programming, errors and exceptions can occur when a program runs into unexpected conditions — such as dividing by zero, accessing invalid array indexes, or reading from a missing file.
Without proper handling, these issues can cause the program to crash.
Exception handling in Java allows developers to detect, handle, and recover from runtime errors gracefully, ensuring the program continues to run or shuts down safely.
2. Using try-catch Blocks
The try-catch block is the foundation of Java’s exception handling mechanism.
Code that might cause an error is placed inside the try block, and the catch block handles the exception if it occurs.
Syntax:
try {
    // Code that might throw an exception
} catch (ExceptionType e) {
    // Code to handle the exception
}
Example – Division by zero:
public class TryCatchExample {
    public static void main(String[] args) {
        try {
            int a = 10, b = 0;
            int result = a / b; // This will cause an ArithmeticException
            System.out.println("Result: " + result);
        } catch (ArithmeticException e) {
            System.out.println("Error: Cannot divide by zero.");
        }
    }
}
Output:
Error: Cannot divide by zero.
3. Using finally and Multiple Catch Blocks
finally Block
The finally block is used to execute code no matter what happens — whether an exception is thrown or not.
It’s commonly used to close files, release resources, or clean up memory.
Example:
public class FinallyExample {
    public static void main(String[] args) {
        try {
            int[] numbers = {1, 2, 3};
            System.out.println(numbers[5]); // ArrayIndexOutOfBoundsException
        } catch (ArrayIndexOutOfBoundsException e) {
            System.out.println("Error: Index out of range.");
        } finally {
            System.out.println("Program finished running.");
        }
    }
}
Output:
Error: Index out of range.
Program finished running.
Multiple Catch Blocks
You can use multiple catch blocks to handle different types of exceptions separately.
Example:
public class MultipleCatchExample {
    public static void main(String[] args) {
        try {
            int[] arr = new int[3];
            arr[3] = 10; // ArrayIndexOutOfBoundsException
            int result = 10 / 0; // ArithmeticException
        } catch (ArithmeticException e) {
            System.out.println("Error: Division by zero.");
        } catch (ArrayIndexOutOfBoundsException e) {
            System.out.println("Error: Array index out of bounds.");
        } catch (Exception e) {
            System.out.println("General error occurred.");
        }
    }
}
Output:
Error: Array index out of bounds.
The
catchblocks are checked in order, so always put more specific exceptions before more general ones.
4. Common Exceptions in Java and How to Prevent Them
| Exception | Cause | Prevention |
|---|---|---|
ArithmeticException | Dividing by zero | Check the denominator before dividing |
NullPointerException | Accessing an object that is null | Ensure objects are properly initialized |
ArrayIndexOutOfBoundsException | Accessing invalid array indexes | Validate array length before accessing elements |
NumberFormatException | Invalid number conversion | Validate user input before parsing |
FileNotFoundException | File does not exist | Check file path before opening |
IOException | Input/output operation failure | Handle file operations with try-catch |
Example – Preventing a NullPointerException:
String text = null;
if (text != null) {
    System.out.println(text.length());
} else {
    System.out.println("Text is null, cannot find length.");
}
Output:
Text is null, cannot find length.
Summary
- try-catch blocks handle exceptions and prevent program crashes.
- finally ensures that cleanup code always runs.
- Multiple catch blocks let you handle different error types separately.
- Proper validation helps prevent common exceptions.
By mastering exception handling, you can write Java programs that are more reliable, stable, and user-friendly.
File Handling in Java
File handling is an important part of Java programming that allows you to read from and write to files stored on your computer.
Java provides several classes in the java.io package, such as FileReader, BufferedReader, FileWriter, and BufferedWriter, to perform these operations efficiently.
1. Reading Data from Files
You can read data from text files using FileReader and BufferedReader.FileReader reads characters from a file, and BufferedReader helps read text more efficiently (line by line).
Example – Reading from a File
import java.io.BufferedReader;
import java.io.FileReader;
import java.io.IOException;

public class ReadFileExample {
    public static void main(String[] args) {
        try {
            FileReader fileReader = new FileReader("data.txt");
            BufferedReader bufferedReader = new BufferedReader(fileReader);

            String line;
            while ((line = bufferedReader.readLine()) != null) {
                System.out.println(line);
            }

            bufferedReader.close();
            fileReader.close();
        } catch (IOException e) {
            System.out.println("An error occurred while reading the file.");
            e.printStackTrace();
        }
    }
}
Explanation:
FileReaderopens the file.BufferedReaderreads it line by line.- The
readLine()method returnsnullwhen the end of the file is reached. - Always close readers to free system resources.
Output (if data.txt contains):
Name: Alice
Age: 25
City: London
2. Writing Data to Files
You can write text to files using FileWriter and BufferedWriter.
If the file doesn’t exist, Java creates it automatically.
Example – Writing to a File
import java.io.BufferedWriter;
import java.io.FileWriter;
import java.io.IOException;

public class WriteFileExample {
    public static void main(String[] args) {
        try {
            FileWriter fileWriter = new FileWriter("data.txt");
            BufferedWriter bufferedWriter = new BufferedWriter(fileWriter);

            bufferedWriter.write("Name: Alice\n");
            bufferedWriter.write("Age: 25\n");
            bufferedWriter.write("City: London\n");

            bufferedWriter.close();
            fileWriter.close();

            System.out.println("Data has been written to the file.");
        } catch (IOException e) {
            System.out.println("An error occurred while writing to the file.");
            e.printStackTrace();
        }
    }
}
Explanation:
FileWritercreates or opens the file.BufferedWriterwrites text efficiently.- The
write()method adds content to the file. \nadds a new line after each entry.
Output (in data.txt):
Name: Alice
Age: 25
City: London
3. Example – Saving and Reading User Information
The following example demonstrates how to save user data to a file and then read it back.
import java.io.*;
import java.util.Scanner;

public class UserInfoExample {
    public static void main(String[] args) {
        Scanner scanner = new Scanner(System.in);

        try {
            // Writing user information
            FileWriter fw = new FileWriter("user.txt");
            BufferedWriter bw = new BufferedWriter(fw);

            System.out.print("Enter your name: ");
            String name = scanner.nextLine();

            System.out.print("Enter your age: ");
            int age = scanner.nextInt();

            bw.write("Name: " + name + "\n");
            bw.write("Age: " + age + "\n");

            bw.close();
            fw.close();
            System.out.println("User information saved successfully.");

            // Reading user information
            FileReader fr = new FileReader("user.txt");
            BufferedReader br = new BufferedReader(fr);
            System.out.println("\n--- Reading from file ---");
            String line;
            while ((line = br.readLine()) != null) {
                System.out.println(line);
            }

            br.close();
            fr.close();
        } catch (IOException e) {
            System.out.println("An error occurred during file handling.");
        }

        scanner.close();
    }
}
Sample Output:
Enter your name: Alice
Enter your age: 25
User information saved successfully.

--- Reading from file ---
Name: Alice
Age: 25
4. Best Practices for File Handling
- Always close file streams (
close()) to prevent memory leaks. - Use try-with-resources for automatic closing (in Java 7+).
- Always handle exceptions (e.g.,
IOException) properly. - Check if a file exists before reading it using
File.exists().
Summary
| Class | Purpose | Common Methods |
|---|---|---|
FileReader | Reads characters from a file | read(), close() |
BufferedReader | Reads text efficiently (line by line) | readLine(), close() |
FileWriter | Writes characters to a file | write(), close() |
BufferedWriter | Writes text efficiently | write(), newLine(), close() |
Faqs:
What is Java and why is it popular?
Java is a high-level, object-oriented programming language used to build applications for web, mobile, and desktop. Its popularity comes from being platform-independent, easy to learn, and widely supported in the tech industry.
Do I need prior programming experience to learn Java?
No. Java is beginner-friendly, and you can start learning it from scratch without prior programming experience. Understanding basic logic and problem-solving skills can help you learn faster.
How do I run my first Java program?
After installing the Java Development Kit (JDK) and an IDE (like IntelliJ IDEA or Eclipse), you can write your first program using the main method and run it directly in your IDE to see the output.
How long does it take to learn Java as a beginner?
It varies depending on your practice. Typically, beginners can learn Java basics in 1–3 months, and with consistent practice, you can start building small projects within 3–6 months.
What can I create after learning Java?
After learning Java basics, you can develop console applications, simple games, desktop software, Android apps, and web applications. Java opens doors to many career opportunities in programming.
Conclusion
Learning Java is a valuable skill for anyone looking to start a career in programming or software development. With its simple syntax, object-oriented features, and wide range of applications, Java provides a strong foundation for building everything from small console programs to complex enterprise applications.
By following this step-by-step guide, setting up your environment, understanding core concepts, practicing with projects, and exploring object-oriented programming, you can gain confidence in Java programming. The key is consistent practice and gradually challenging yourself with more complex programs.
Start small, experiment with code, and build real projects. Over time, you’ll not only master the basics of Java but also be ready to explore advanced topics like multithreading, GUI development, and web applications. Remember, programming is a journey—each line of code brings you closer to becoming a proficient Java developer.